Johto: Unterschied zwischen den Versionen
Pk-fan (Diskussion | Beiträge) |
K (Removing whitespace) |
||
| (2 dazwischenliegende Versionen von 2 Benutzern werden nicht angezeigt) | |||
| Zeile 8: | Zeile 8: | ||
|Professor=[[Professor Lind]] | |Professor=[[Professor Lind]] | ||
|Starter= | |Starter= | ||
* {{name | * {{#icon:Endivie|name=link}} | ||
* {{name | * {{#icon:Feurigel|name=link}} | ||
* {{name | * {{#icon:Karnimani|name=link}} | ||
|Verbrecherteam=[[Team Rocket (Organisation)|Team Rocket]] | |Verbrecherteam=[[Team Rocket (Organisation)|Team Rocket]] | ||
|Austragungsort=[[Indigo Plateau]] | |Austragungsort=[[Indigo Plateau]] | ||
| Zeile 29: | Zeile 29: | ||
|Manga-Debüt=[[Kapitel 90 (Pocket Monsters SPECIAL)|Kapitel 90]] | |Manga-Debüt=[[Kapitel 90 (Pocket Monsters SPECIAL)|Kapitel 90]] | ||
}} | }} | ||
'''Johto''' ist die [[Region]], in der das Geschehen von [[Pokémon Gold & Silber|Pokémon Gold, Silber]] und | '''Johto''' ist die [[Region]], in der das Geschehen von [[Pokémon Gold & Silber|Pokémon Gold, Silber]] und | ||
[[Pokémon Kristall]] sowie [[Pokémon HeartGold und SoulSilver]] | [[Pokémon Kristall]] sowie [[Pokémon HeartGold und SoulSilver]] hauptsächlich spielt. Hier gibt es überwiegend [[Pokémon-Liste|Pokémon]] der [[Zweite Spielgeneration|zweiten Generation]]. Johto ist mit Kanto verbunden und somit lassen sich beide Regionen in Pokémon Gold, Silber, Kristall sowie HeartGold und SoulSilver bereisen. Dies kam bisher in keiner weiteren Spielgeneration vor. | ||
== Starter == | == Starter == | ||
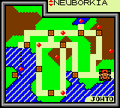
Eins der folgenden Pokémon erhält man zu Beginn des Spiels von [[Professor Lind]] in [[Neuborkia]]. Es ist auf Level 5. | Eins der folgenden Pokémon erhält man zu Beginn des Spiels von [[Professor Lind]] in [[Neuborkia]]. Es ist auf Level 5. | ||
{| class="centered round c" cellspacing=3 style="border: 3px solid #{{Region/Color|Johto}};" | {| class="centered round c" cellspacing=3 style="border: 3px solid #{{Region/Color|Johto}};" | ||
|- | |- | ||
! style="background:#{{Region/Color|Johto}}" colspan="4" class="round-top" | <div class="blink">[[Starter-Pokémon]]</div> | ! style="background:#{{Region/Color|Johto}}" colspan="4" class="round-top" | <div class="blink">[[Starter-Pokémon]]</div> | ||
|- | |- | ||
! style="background:#{{Region/Color|Johto}}"| Sprite | ! style="background:#{{Region/Color|Johto}}"| Sprite | ||
! class="darkBg1" | {{Sprite|152|hgss}} | ! class="darkBg1" | {{Sprite|152|hgss}} | ||
! class="darkBg1" | {{Sprite|155|hgss}} | ! class="darkBg1" | {{Sprite|155|hgss}} | ||
! class="darkBg1" | {{Sprite|158|hgss}} | ! class="darkBg1" | {{Sprite|158|hgss}} | ||
|- | |- | ||
! style="background:#{{Region/Color|Johto}}"| Name | ! style="background:#{{Region/Color|Johto}}"| Name | ||
! class="darkBg1" | [[Endivie]] | ! class="darkBg1" | [[Endivie]] | ||
! class="darkBg1" | [[Feurigel]] | ! class="darkBg1" | [[Feurigel]] | ||
! class="darkBg1" | [[Karnimani]] | ! class="darkBg1" | [[Karnimani]] | ||
|- | |- | ||
! style="background:#{{Region/Color|Johto}}"| <div class="blink">[[Typen|Typ]]</div> | ! style="background:#{{Region/Color|Johto}}"| <div class="blink">[[Typen|Typ]]</div> | ||
| style="background:#{{Typ/Color/Pflanze-dunkel}}"| {{ic | | style="background:#{{Typ/Color/Pflanze-dunkel}}"| {{#ic:Pflanze}} | ||
| style="background:#{{Typ/Color/Feuer-dunkel}}"| {{ic | | style="background:#{{Typ/Color/Feuer-dunkel}}"| {{#ic:Feuer}} | ||
| style="background:#{{Typ/Color/Wasser-dunkel}}"| {{ic | | style="background:#{{Typ/Color/Wasser-dunkel}}"| {{#ic:Wasser}} | ||
|- | |- | ||
! style="background:#{{Region/Color|Johto}}" class="round-bottomleft" | <div class="blink">[[Entwicklung]]en</div> | ! style="background:#{{Region/Color|Johto}}" class="round-bottomleft" | <div class="blink">[[Entwicklung]]en</div> | ||
| class="darkBg1" | <small>{{ | | class="darkBg1" | <small>{{#icon:Lorblatt|name=link}} Lv. 16<br />{{#icon:Meganie|name=link}} Lv. 32</small> | ||
| class="darkBg1" | <small>{{ | | class="darkBg1" | <small>{{#icon:Igelavar|name=link}} Lv. 14<br />{{#icon:Tornupto|name=link}} Lv. 36</small> | ||
| class="darkBg1 round-bottomright" | <small>{{ | | class="darkBg1 round-bottomright" | <small>{{#icon:Tyracroc|name=link}} Lv. 18<br />{{#icon:Impergator|name=link}} Lv. 30</small> | ||
|} | |} | ||
| Zeile 122: | Zeile 122: | ||
|- style="background:#{{Typ/Color/Käfer-hell}}" | |- style="background:#{{Typ/Color/Käfer-hell}}" | ||
| [[Datei:HGSS Azalea City.png|100px]] | | [[Datei:HGSS Azalea City.png|100px]] | ||
! style="background:#{{Typ/Color/Käfer-dunkel}}" | | ! style="background:#{{Typ/Color/Käfer-dunkel}}" | [[Azalea City]] | ||
| im Osten: [[Route 33 (Johto)|Route 33]]<br/>im Westen: [[Steineichenwald]] | | im Osten: [[Route 33 (Johto)|Route 33]]<br/>im Westen: [[Steineichenwald]] | ||
| [[Pokémon-Arena von Azalea City|Pokémon-Arena]]<br /> [[Flegmon-Brunnen]]<br /> [[Kurt|Kurts Haus]]<br /> [[Azalea City#Haus des Köhlers|Haus des Köhlers]] | | [[Pokémon-Arena von Azalea City|Pokémon-Arena]]<br /> [[Flegmon-Brunnen]]<br /> [[Kurt|Kurts Haus]]<br /> [[Azalea City#Haus des Köhlers|Haus des Köhlers]] | ||
| Zeile 203: | Zeile 203: | ||
! bgcolor="{{Region/Color|Johto}}" | Spiele | ! bgcolor="{{Region/Color|Johto}}" | Spiele | ||
! bgcolor="{{Region/Color|Johto}}" | Bemerkung | ! bgcolor="{{Region/Color|Johto}}" | Bemerkung | ||
|- | |- | ||
! style="background:#{{Route/Color/Straße-hell}}" | [[Alph-Ruinen]] | ! style="background:#{{Route/Color/Straße-hell}}" | [[Alph-Ruinen]] | ||
| colspan="2" | [[Route 32 (Johto)|Route 32]] / [[Route 36 (Johto)|Route 36]] / [[Einheitstunnel]] | | colspan="2" | [[Route 32 (Johto)|Route 32]] / [[Route 36 (Johto)|Route 36]] / [[Einheitstunnel]] | ||
| | | | ||
| 2 | | 2 | ||
| {{sk|G|Si|K|HG|SS}} | | {{sk|G|Si|K|HG|SS}} | ||
| | | | ||
|- | |- | ||
! style="background:#{{Route/Color/Höhle-hell}}" | [[Drachenhöhle]] | ! style="background:#{{Route/Color/Höhle-hell}}" | [[Drachenhöhle]] | ||
| colspan="2" | [[Ebenholz City]] | | colspan="2" | [[Ebenholz City]] | ||
| [[Drachenhöhle|Schrein des Drachenclans]] | | [[Drachenhöhle|Schrein des Drachenclans]] | ||
| 2 | | 2 | ||
| {{sk|G|Si|K|HG|SS}} | | {{sk|G|Si|K|HG|SS}} | ||
| | | | ||
|- | |- | ||
! style="background:#{{Route/Color/Straße-hell}}" | [[Duellturm (Johto)|Duellturm]] | ! style="background:#{{Route/Color/Straße-hell}}" | [[Duellturm (Johto)|Duellturm]] | ||
| colspan="2" | [[Route 40 (Johto)|Route 40]] <small>{{sk|K}}</small> / [[Kampfzone (4. Generation)|Kampfzone]] <small>{{sk|HG|SS}}</small> | | colspan="2" | [[Route 40 (Johto)|Route 40]] <small>{{sk|K}}</small> / [[Kampfzone (4. Generation)|Kampfzone]] <small>{{sk|HG|SS}}</small> | ||
| Zeile 224: | Zeile 224: | ||
| {{sk|K|HG|SS}} | | {{sk|K|HG|SS}} | ||
| | | | ||
|- | |- | ||
! style="background:#{{Route/Color/Straße-hell}}" | [[Dukatia-Passage]] | ! style="background:#{{Route/Color/Straße-hell}}" | [[Dukatia-Passage]] | ||
| colspan="2" | [[Dukatia City]] | | colspan="2" | [[Dukatia City]] | ||
| Zeile 230: | Zeile 230: | ||
| 3 | | 3 | ||
| {{sk|G|Si|K|HG|SS}} | | {{sk|G|Si|K|HG|SS}} | ||
| | | | ||
|- | |- | ||
! style="background:#{{Route/Color/Höhle-hell}}" | [[Dunkelhöhle]] | ! style="background:#{{Route/Color/Höhle-hell}}" | [[Dunkelhöhle]] | ||
| colspan="2" | [[Route 31 (Johto)|Route 31]] / [[Route 45 (Johto)|Route 45]] / [[Route 46 (Johto)|Route 46]] | | colspan="2" | [[Route 31 (Johto)|Route 31]] / [[Route 45 (Johto)|Route 45]] / [[Route 46 (Johto)|Route 46]] | ||
| Zeile 238: | Zeile 238: | ||
| {{sk|G|Si|K|HG|SS}} | | {{sk|G|Si|K|HG|SS}} | ||
| | | | ||
|- | |- | ||
! style="background:#{{Route/Color/Höhle-hell}}" | [[Einheitstunnel]] | ! style="background:#{{Route/Color/Höhle-hell}}" | [[Einheitstunnel]] | ||
| colspan="2" | [[Route 32 (Johto)|Route 32]] / [[Route 33 (Johto)|Route 33]] / [[Alph-Ruinen]] | | colspan="2" | [[Route 32 (Johto)|Route 32]] / [[Route 33 (Johto)|Route 33]] / [[Alph-Ruinen]] | ||
| Zeile 245: | Zeile 245: | ||
| {{sk|G|Si|K|HG|SS}} | | {{sk|G|Si|K|HG|SS}} | ||
| | | | ||
|- | |- | ||
! style="background:#{{Route/Color/Höhle-hell}}" | [[Eispfad]] | ! style="background:#{{Route/Color/Höhle-hell}}" | [[Eispfad]] | ||
| [[Route 44 (Johto)|Route 44]] | | [[Route 44 (Johto)|Route 44]] | ||
| Zeile 251: | Zeile 251: | ||
| | | | ||
| 3 | | 3 | ||
| {{sk|G|Si|K|HG|SS}} | | {{sk|G|Si|K|HG|SS}} | ||
| | | | ||
|- | |- | ||
! style="background:#{{Route/Color/Straße-hell}}" | [[Felsenherzturm]] | ! style="background:#{{Route/Color/Straße-hell}}" | [[Felsenherzturm]] | ||
| colspan="2" | [[Route 47 (Johto)|Route 47]] | | colspan="2" | [[Route 47 (Johto)|Route 47]] | ||
| | | | ||
| 1 | | 1 | ||
| {{sk|HG|SS}} | | {{sk|HG|SS}} | ||
| {{name | | {{#icon:Kyogre|name=link}} fangbar <small>{{sk|HG}}</small><br />{{#icon:Groudon|name=link}} fangbar <small>{{sk|SS}}</small><br />{{#icon:Rayquaza|name=link}} fangbar | ||
|- | |- | ||
! style="background:#{{Route/Color/Höhle-hell}}" | [[Felsklippentor]] | ! style="background:#{{Route/Color/Höhle-hell}}" | [[Felsklippentor]] | ||
| [[Anemonia City]] | | [[Anemonia City]] | ||
| Zeile 266: | Zeile 266: | ||
| | | | ||
| 1 | | 1 | ||
| {{sk|HG|SS}} | | {{sk|HG|SS}} | ||
| | | | ||
|- | |- | ||
! style="background:#{{Route/Color/Höhle-hell}}" | [[Felsschlundhöhle]] | ! style="background:#{{Route/Color/Höhle-hell}}" | [[Felsschlundhöhle]] | ||
| colspan="2" | [[Route 47 (Johto)|Route 47]] | | colspan="2" | [[Route 47 (Johto)|Route 47]] | ||
| | | | ||
| 3 | | 3 | ||
| {{sk|HG|SS}} | | {{sk|HG|SS}} | ||
| | | | ||
|- | |- | ||
! style="background:#{{Route/Color/Höhle-hell}}" | [[Flegmon-Brunnen]] | ! style="background:#{{Route/Color/Höhle-hell}}" | [[Flegmon-Brunnen]] | ||
| colspan="2" | [[Azalea City]] | | colspan="2" | [[Azalea City]] | ||
| Zeile 281: | Zeile 281: | ||
| 2 | | 2 | ||
| {{sk|G|Si|K|HG|SS}} | | {{sk|G|Si|K|HG|SS}} | ||
| | | | ||
|- | |- | ||
! style="background:#{{Route/Color/Land-hell}}" | [[Glockenklangpfad]] | ! style="background:#{{Route/Color/Land-hell}}" | [[Glockenklangpfad]] | ||
| colspan="2" | [[Teak City]] | | colspan="2" | [[Teak City]] | ||
| Zeile 288: | Zeile 288: | ||
| 1 | | 1 | ||
| {{sk|HG|SS}} | | {{sk|HG|SS}} | ||
| | | | ||
|- | |- | ||
! style="background:#{{Route/Color/Straße-hell}}" | [[Glockenturm]] | ! style="background:#{{Route/Color/Straße-hell}}" | [[Glockenturm]] | ||
| colspan="2" | [[Teak City]] <small>{{sk|G|Si|K}}</small> / [[Glockenklangpfad]] <small>{{sk|HG|SS}}</small> | | colspan="2" | [[Teak City]] <small>{{sk|G|Si|K}}</small> / [[Glockenklangpfad]] <small>{{sk|HG|SS}}</small> | ||
| | | | ||
| 11 | | 11 | ||
| {{sk|G|Si|K|HG|SS}} | | {{sk|G|Si|K|HG|SS}} | ||
| {{ | | {{#icon:Ho-Oh|name=link}} fangbar<br />{{#icon:Suicune|name=link}} fangbar <small>{{sk|K}}</small> | ||
|- | |- | ||
! style="background:#{{Route/Color/Straße-hell}}" | [[Kampfarkaden]] | ! style="background:#{{Route/Color/Straße-hell}}" | [[Kampfarkaden]] | ||
| colspan="2" | [[Kampfzone (4. Generation)|Kampfzone]] | | colspan="2" | [[Kampfzone (4. Generation)|Kampfzone]] | ||
| | | | ||
| 1 | | 1 | ||
| {{sk|HG|SS}} | | {{sk|HG|SS}} | ||
| | | | ||
|- | |- | ||
! style="background:#{{Route/Color/Straße-hell}}" | [[Kampffabrik (4. Generation)|Kampffabrik]] | ! style="background:#{{Route/Color/Straße-hell}}" | [[Kampffabrik (4. Generation)|Kampffabrik]] | ||
| colspan="2" | [[Kampfzone (4. Generation)|Kampfzone]] | | colspan="2" | [[Kampfzone (4. Generation)|Kampfzone]] | ||
| Zeile 310: | Zeile 310: | ||
| {{sk|HG|SS}} | | {{sk|HG|SS}} | ||
| | | | ||
|- | |- | ||
! style="background:#{{Route/Color/Straße-hell}}" | [[Kampfpalais]] | ! style="background:#{{Route/Color/Straße-hell}}" | [[Kampfpalais]] | ||
| colspan="2" | [[Kampfzone (4. Generation)|Kampfzone]] | | colspan="2" | [[Kampfzone (4. Generation)|Kampfzone]] | ||
| | | | ||
| 1 | | 1 | ||
| {{sk|HG|SS}} | | {{sk|HG|SS}} | ||
| | | | ||
|- | |- | ||
! style="background:#{{Route/Color/Straße-hell}}" | [[Kampfsaal]] | ! style="background:#{{Route/Color/Straße-hell}}" | [[Kampfsaal]] | ||
| colspan="2" | [[Kampfzone (4. Generation)|Kampfzone]] | | colspan="2" | [[Kampfzone (4. Generation)|Kampfzone]] | ||
| | | | ||
| 1 | | 1 | ||
| {{sk|HG|SS}} | | {{sk|HG|SS}} | ||
| | | | ||
|- | |- | ||
! style="background:#{{Route/Color/Straße-hell}}" | [[Kampfzone (4. Generation)|Kampfzone]] | ! style="background:#{{Route/Color/Straße-hell}}" | [[Kampfzone (4. Generation)|Kampfzone]] | ||
| colspan="2" | [[Kampfzonenzugang]] | | colspan="2" | [[Kampfzonenzugang]] | ||
| | | | ||
| 1 | | 1 | ||
| {{sk|HG|SS}} | | {{sk|HG|SS}} | ||
| | | | ||
|- | |- | ||
! style="background:#{{Route/Color/Straße-hell}}" | [[Kampfzonenzugang]] | ! style="background:#{{Route/Color/Straße-hell}}" | [[Kampfzonenzugang]] | ||
| colspan="2" | [[Route 40 (Johto)|Route 40]] | | colspan="2" | [[Route 40 (Johto)|Route 40]] | ||
| [[Kampfzone (4. Generation)|Kampfzone]] | | [[Kampfzone (4. Generation)|Kampfzone]] | ||
| 1 | | 1 | ||
| {{sk|HG|SS}} | | {{sk|HG|SS}} | ||
| | | | ||
|- | |- | ||
! style="background:#{{Route/Color/Höhle-hell}}" | [[Kesselberg]] | ! style="background:#{{Route/Color/Höhle-hell}}" | [[Kesselberg]] | ||
| colspan="2" | [[Route 42 (Johto)|Route 42]] | | colspan="2" | [[Route 42 (Johto)|Route 42]] | ||
| | | | ||
| 3 | | 3 | ||
| {{sk|G|Si|K|HG|SS}} | | {{sk|G|Si|K|HG|SS}} | ||
| | | | ||
|- | |- | ||
! style="background:#{{Route/Color/Straße-hell}}" | [[Knofensa-Turm]] | ! style="background:#{{Route/Color/Straße-hell}}" | [[Knofensa-Turm]] | ||
| colspan="2" | [[Viola City]] | | colspan="2" | [[Viola City]] | ||
| | | | ||
| 3 | | 3 | ||
| {{sk|G|Si|K|HG|SS}} | | {{sk|G|Si|K|HG|SS}} | ||
| | | | ||
|- | |- | ||
! style="background:#{{Route/Color/Straße-hell}}" | [[Leuchtturm (Oliviana City)|Leuchtturm]] | ! style="background:#{{Route/Color/Straße-hell}}" | [[Leuchtturm (Oliviana City)|Leuchtturm]] | ||
| colspan="2" | [[Oliviana City]] | | colspan="2" | [[Oliviana City]] | ||
| | | | ||
| 6 | | 6 | ||
| {{sk|G|Si|K|HG|SS}} | | {{sk|G|Si|K|HG|SS}} | ||
| | | | ||
|- | |- | ||
! style="background:#{{Route/Color/Meer-hell}}" | [[M.S. Aqua]] | ! style="background:#{{Route/Color/Meer-hell}}" | [[M.S. Aqua]] | ||
| [[Oliviana City]] | | [[Oliviana City]] | ||
| [[Orania City]] | | [[Orania City]] | ||
| | | | ||
| 2 | | 2 | ||
| {{sk|G|Si|K|HG|SS}} | | {{sk|G|Si|K|HG|SS}} | ||
| | | | ||
|- | |- | ||
! style="background:#{{Route/Color/Land-hell}}" | [[Nationalpark]] | ! style="background:#{{Route/Color/Land-hell}}" | [[Nationalpark]] | ||
| [[Route 35 (Johto)|Route 35]] | | [[Route 35 (Johto)|Route 35]] | ||
| [[Route 36 (Johto)|Route 36]] | | [[Route 36 (Johto)|Route 36]] | ||
| | | | ||
| 1 | | 1 | ||
| {{sk|G|Si|K|HG|SS}} | | {{sk|G|Si|K|HG|SS}} | ||
| | | | ||
|- | |- | ||
! style="background:#{{Route/Color/Straße-hell}}" | [[Pokéathlon]]hallen | ! style="background:#{{Route/Color/Straße-hell}}" | [[Pokéathlon]]hallen | ||
| colspan="2" | [[Route 35 (Johto)|Route 35]] | | colspan="2" | [[Route 35 (Johto)|Route 35]] | ||
| | | | ||
| 3 | | 3 | ||
| {{sk|HG|SS}} | | {{sk|HG|SS}} | ||
| | | | ||
|- | |- | ||
! style="background:#{{Route/Color/Straße-hell}}" | [[Rocket-Versteck (Mahagonia City)|Rocket-Versteck]] | ! style="background:#{{Route/Color/Straße-hell}}" | [[Rocket-Versteck (Mahagonia City)|Rocket-Versteck]] | ||
| colspan="2" | [[Mahagonia City]] | | colspan="2" | [[Mahagonia City]] | ||
| | | | ||
| 3 | | 3 | ||
| {{sk|G|Si|K|HG|SS}} | | {{sk|G|Si|K|HG|SS}} | ||
| | | | ||
|- | |- | ||
! style="background:#{{Route/Color/Straße-hell}}" | [[Safari-Eingang]] | ! style="background:#{{Route/Color/Straße-hell}}" | [[Safari-Eingang]] | ||
| colspan="2" | [[Route 48 (Johto)|Route 48]] | | colspan="2" | [[Route 48 (Johto)|Route 48]] | ||
| [[Safari-Zone (Johto)|Safari-Zone]] | | [[Safari-Zone (Johto)|Safari-Zone]] | ||
| 1 | | 1 | ||
| {{sk|HG|SS}} | | {{sk|HG|SS}} | ||
| | | | ||
|- | |- | ||
! style="background:#{{Route/Color/Land-hell}}" | [[Safari-Zone (Johto)|Safari-Zone]] | ! style="background:#{{Route/Color/Land-hell}}" | [[Safari-Zone (Johto)|Safari-Zone]] | ||
| colspan="2" | [[Safari-Eingang]] | | colspan="2" | [[Safari-Eingang]] | ||
| | | | ||
| 1 | | 1 | ||
| {{sk|HG|SS}} | | {{sk|HG|SS}} | ||
| | | | ||
|- | |- | ||
! style="background:#{{Route/Color/Wasser-hell}}" | [[See des Zorns]] | ! style="background:#{{Route/Color/Wasser-hell}}" | [[See des Zorns]] | ||
| colspan="2" | [[Route 43 (Johto)|Route 43]] | | colspan="2" | [[Route 43 (Johto)|Route 43]] | ||
| | | | ||
| 1 | | 1 | ||
| {{sk|G|Si|K|HG|SS}} | | {{sk|G|Si|K|HG|SS}} | ||
| | | | ||
|- | |- | ||
! style="background:#{{Route/Color/Höhle-hell}}" | [[Silberberg]] | ! style="background:#{{Route/Color/Höhle-hell}}" | [[Silberberg]] | ||
| colspan="2" | [[Route 28 (Kanto)|Route 28]] | | colspan="2" | [[Route 28 (Kanto)|Route 28]] | ||
| | | | ||
| 1 | | 1 | ||
| {{sk|G|Si|K|HG|SS}} | | {{sk|G|Si|K|HG|SS}} | ||
| {{name | | {{#icon:Lavados|name=link}} fangbar <small>{{sk|HG|SS}}</small> | ||
|- | |- | ||
! style="background:#{{Route/Color/Straße-hell}}" | [[Sinjoh-Ruinen]] | ! style="background:#{{Route/Color/Straße-hell}}" | [[Sinjoh-Ruinen]] | ||
| colspan="2" | — | | colspan="2" | — | ||
| | | | ||
| 1 | | 1 | ||
| {{sk|HG|SS}} | | {{sk|HG|SS}} | ||
| [[Eier und Zucht|Ei]] von {{name | | [[Eier und Zucht|Ei]] von {{#icon:Dialga|name=link}} erhältlich<br />[[Eier und Zucht|Ei]] von {{#icon:Palkia|name=link}} erhältlich<br />[[Eier und Zucht|Ei]] von {{#icon:Giratina|name=link}} erhältlich | ||
|- | |- | ||
! style="background:#{{Route/Color/Land-hell}}" | [[Steineichenwald]] | ! style="background:#{{Route/Color/Land-hell}}" | [[Steineichenwald]] | ||
| [[Azalea City]] | | [[Azalea City]] | ||
| Zeile 430: | Zeile 430: | ||
| | | | ||
| 1 | | 1 | ||
| {{sk|G|Si|K|HG|SS}} | | {{sk|G|Si|K|HG|SS}} | ||
| {{name | | {{#icon:Celebi|name=link}} fangbar | ||
|- | |- | ||
! style="background:#{{Route/Color/Höhle-hell}}" | [[Strudelinseln]] | ! style="background:#{{Route/Color/Höhle-hell}}" | [[Strudelinseln]] | ||
| colspan="2" | [[Route 41 (Johto)|Route 41]] | | colspan="2" | [[Route 41 (Johto)|Route 41]] | ||
| | | | ||
| 3 | | 3 | ||
| {{sk|G|Si|K|HG|SS}} | | {{sk|G|Si|K|HG|SS}} | ||
| {{name | | {{#icon:Lugia|name=link}} fangbar | ||
|- | |- | ||
! style="background:#{{Route/Color/Straße-hell}}" | [[Turmruine]] | ! style="background:#{{Route/Color/Straße-hell}}" | [[Turmruine]] | ||
| colspan="2" | [[Teak City]] | | colspan="2" | [[Teak City]] | ||
| | | | ||
| 2 | | 2 | ||
| {{sk|G|Si|K|HG|SS}} | | {{sk|G|Si|K|HG|SS}} | ||
| {{name | | {{#icon:Suicune|name=link}} fangbar <small>{{sk|K}}</small> | ||
|} | |} | ||
| Zeile 505: | Zeile 505: | ||
|- | |- | ||
! class="darkBg1" | '''Stadtbevölkerung<br />Gesamt''' | ! class="darkBg1" | '''Stadtbevölkerung<br />Gesamt''' | ||
| style="text-align:center" | 317 | | style="text-align:center" | 317 | ||
| style="text-align:center" | 465 | | style="text-align:center" | 465 | ||
|} | |} | ||
| Zeile 522: | Zeile 522: | ||
[[Datei:LigaSymbolJohto.png|Aus-<br/>zeichnung in {{sk|HG|SS}}|right|framed]] | [[Datei:LigaSymbolJohto.png|Aus-<br/>zeichnung in {{sk|HG|SS}}|right|framed]] | ||
{| class="prettytable c" | {| class="prettytable c" | ||
|- class="darkBg2" | |- class="darkBg2" | ||
! [[Typen|Typ]] | ! [[Typen|Typ]] | ||
! [[Arenaleiter]] | ! [[Arenaleiter]] | ||
! Stadt | ! Stadt | ||
|- | |- | ||
| {{ic | | {{#ic:Flug}} | ||
| {{tr|Overworldsprite|Falk|S2W2}} [[Falk]] | | {{tr|Overworldsprite|Falk|S2W2}} [[Falk]] | ||
| [[Viola City]] | | [[Viola City]] | ||
|- | |- | ||
| {{ic | | {{#ic:Käfer}} | ||
| {{tr|Overworldsprite|Kai|S2W2}} [[Kai]] | | {{tr|Overworldsprite|Kai|S2W2}} [[Kai]] | ||
| [[Azalea City]] | | [[Azalea City]] | ||
|- | |- | ||
| {{ic | | {{#ic:Normal}} | ||
| {{tr|Overworldsprite|Bianka|S2W2}} [[Bianka]] | | {{tr|Overworldsprite|Bianka|S2W2}} [[Bianka]] | ||
| [[Dukatia City]] | | [[Dukatia City]] | ||
|- | |- | ||
| {{ic | | {{#ic:Geist}} | ||
| {{tr|Overworldsprite|Jens|S2W2}} [[Jens]] | | {{tr|Overworldsprite|Jens|S2W2}} [[Jens]] | ||
| [[Teak City]] | | [[Teak City]] | ||
|- | |- | ||
| {{ic | | {{#ic:Kampf}} | ||
| {{tr|Overworldsprite|Hartwig|S2W2}} [[Hartwig]] | | {{tr|Overworldsprite|Hartwig|S2W2}} [[Hartwig]] | ||
| [[Anemonia City]] | | [[Anemonia City]] | ||
|- | |- | ||
| {{ic | | {{#ic:Stahl}} | ||
| {{tr|Overworldsprite|Jasmin|S2W2}} [[Jasmin]] | | {{tr|Overworldsprite|Jasmin|S2W2}} [[Jasmin]] | ||
| [[Oliviana City]] | | [[Oliviana City]] | ||
|- | |- | ||
| {{ic | | {{#ic:Eis}} | ||
| {{tr|Overworldsprite|Norbert|S2W2}} [[Norbert]] | | {{tr|Overworldsprite|Norbert|S2W2}} [[Norbert]] | ||
| [[Mahagonia City]] | | [[Mahagonia City]] | ||
|- | |- | ||
| {{ic | | {{#ic:Drache}} | ||
| {{tr|Overworldsprite|Sandra|S2W2}} [[Sandra]] | | {{tr|Overworldsprite|Sandra|S2W2}} [[Sandra]] | ||
| [[Ebenholz City]] | | [[Ebenholz City]] | ||
Version vom 4. Februar 2018, 03:30 Uhr
Vorlage:Region Infobox Johto ist die Region, in der das Geschehen von Pokémon Gold, Silber und Pokémon Kristall sowie Pokémon HeartGold und SoulSilver hauptsächlich spielt. Hier gibt es überwiegend Pokémon der zweiten Generation. Johto ist mit Kanto verbunden und somit lassen sich beide Regionen in Pokémon Gold, Silber, Kristall sowie HeartGold und SoulSilver bereisen. Dies kam bisher in keiner weiteren Spielgeneration vor.
Starter
Eins der folgenden Pokémon erhält man zu Beginn des Spiels von Professor Lind in Neuborkia. Es ist auf Level 5.
| Sprite | |||
|---|---|---|---|
| Name | Endivie | Feurigel | Karnimani |

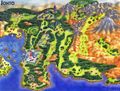
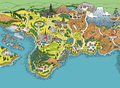
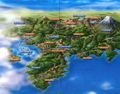
Karten von Johto
-
-
-

-
-
Offizielles Anime‐Artwork


Verbindung mit der realen Welt
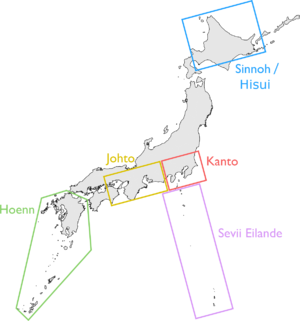
- → Hauptartikel: Regionen
Johto ist, genau wie die anderen Regionen Kanto, Hoenn und Sinnoh, auch in der realen Welt zu finden. Die Region basiert auf dem japanischen Zweckverband und der gleichnamigen Landschaft Kansai![]() . Johto ist in den Spielen sehr viel kleiner als auf dem Atlas. Die Landzunge in der Mitte der Karte ragt in den Spielen sehr viel weiter ins Meer hinaus als in der realen Welt.
. Johto ist in den Spielen sehr viel kleiner als auf dem Atlas. Die Landzunge in der Mitte der Karte ragt in den Spielen sehr viel weiter ins Meer hinaus als in der realen Welt.
Liste der Städte in der Johto-Region


Liste der Sehenswürdigkeiten in Johto
Im Folgenden werden alle Sehenswürdigkeiten Johtos alphabetisch aufgelistet:
Demografie
| Stadt | Demografie | |||
|---|---|---|---|---|
| GSK | HGSS | |||
| Neuborkia | 10 | |||
| Rosalia City | 18 | 22 | ||
| Viola City | 40 | 51 | ||
| Azalea City | 26 | 30 | ||
| Dukatia City | 105 | 123 | ||
| Teak City | 31 | 45 | ||
| Oliviana City | 27 | 44 | ||
| Kampfzonenzugang | - | 22 | ||
| Anemonia City | 19 | 27 | ||
| Safari-Eingang | - | 26 | ||
| Mahagonia City | 14 | 24 | ||
| Ebenholz City | 27 | 41 | ||
| Stadtbevölkerung Gesamt |
317 | 465 | ||
Veränderungen in HeartGold und SoulSilver
- Zwei neue Routen: Route 47 und 48.
- Westlich von Anemonia City gibt es eine Safari-Zone.
- Von Ebenholz City fließt nun ein Fluss ins Tal.
- Die Strecke vom Magnetzug von Dukatia City nach Saffronia City ist zu sehen.
- Der Duellturm bei Oliviana City wurde zu einer Kampfzone.
- In Dukatia City steht im Westen nun das Global Terminal.
- Da „Zinnturm“ ein Übersetzungsfehler war, wurde er in „Glockenturm“ umbenannt.
- Die Routen und Städte sind wesentlich größer als im Original, sehen aber gleich aus.
Liste der Arenaleiter

zeichnung in HGSS
| Typ | Arenaleiter | Stadt |
|---|---|---|
| Viola City | ||
| Azalea City | ||
| Dukatia City | ||
| Teak City | ||
| Anemonia City | ||
| Oliviana City | ||
| Mahagonia City | ||
| Ebenholz City |
Trivia
- In den Artworks zum Spiel sieht der Radioturm in Dukatia City wie der Tokyo Tower
 aus.
aus. - Es, ist zusammen mit Alola, die einzige Region, in der keine neuen Fossilien eingeführt wurden.
- Johto ist die einzige Region, in der die Arenaleiter keinen Starter-Typ als Haupttyp haben.
- Die Städte in Johto wurden nach verschiedenen Holz-Sorten benannt.