Kanto: Unterschied zwischen den Versionen
K (Änderung 1463565 von Kappador (Diskussion | Beiträge) wurde rückgängig gemacht; Almia ist nicht auf der Karte umkreist, ist aber trotzdem drauf (direkt links von Sinnoh)) |
K (Removing whitespace) |
||
| (8 dazwischenliegende Versionen von 5 Benutzern werden nicht angezeigt) | |||
| Zeile 8: | Zeile 8: | ||
|Professor=[[Professor Samuel Eich|Professor Eich]] | |Professor=[[Professor Samuel Eich|Professor Eich]] | ||
|Starter= | |Starter= | ||
* {{name | * {{#icon:Bisasam|name=link}} | ||
* {{name | * {{#icon:Glumanda|name=link}} | ||
* {{name | * {{#icon:Schiggy|name=link}} | ||
|Verbrecherteam=[[Team Rocket (Organisation)|Team Rocket]] | |Verbrecherteam=[[Team Rocket (Organisation)|Team Rocket]] | ||
|Austragungsort=[[Indigo Plateau]] | |Austragungsort=[[Indigo Plateau]] | ||
| Zeile 34: | Zeile 34: | ||
== Starter == | == Starter == | ||
=== Pokémon Rot/Grün/Blau/Feuerrot/Blattgrün === | === Pokémon Rot/Grün/Blau/Feuerrot/Blattgrün === | ||
{| class="centered round c" cellspacing=3 style="border: 3px solid #{{Region/Color|Kanto}};" | {| class="centered round c" cellspacing=3 style="border: 3px solid #{{Region/Color|Kanto}};" | ||
|- | |- | ||
! style="background:#{{Region/Color|Kanto}}" colspan="4" class="round-top" | <div class="blink">[[Starter-Pokémon]]</div> | ! style="background:#{{Region/Color|Kanto}}" colspan="4" class="round-top" | <div class="blink">[[Starter-Pokémon]]</div> | ||
|- | |- | ||
! style="background:#{{Region/Color|Kanto}}"| Sprite | ! style="background:#{{Region/Color|Kanto}}"| Sprite | ||
! class="darkBg1" | {{Sprite|001|frbg}} | ! class="darkBg1" | {{Sprite|001|frbg}} | ||
! class="darkBg1" | {{Sprite|004|frbg}} | ! class="darkBg1" | {{Sprite|004|frbg}} | ||
! class="darkBg1" | {{Sprite|007|frbg}} | ! class="darkBg1" | {{Sprite|007|frbg}} | ||
|- | |- | ||
! style="background:#{{Region/Color|Kanto}}"| Name | ! style="background:#{{Region/Color|Kanto}}"| Name | ||
! class="darkBg1" | [[Bisasam]] | ! class="darkBg1" | [[Bisasam]] | ||
! class="darkBg1" | [[Glumanda]] | ! class="darkBg1" | [[Glumanda]] | ||
! class="darkBg1" | [[Schiggy]] | ! class="darkBg1" | [[Schiggy]] | ||
|- | |- | ||
! style="background:#{{Region/Color|Kanto}}"| <div class="blink">[[Typen|Typ]]</div> | ! style="background:#{{Region/Color|Kanto}}"| <div class="blink">[[Typen|Typ]]</div> | ||
| style="background:#{{Typ/Color/Pflanze-dunkel}}"| {{ic | | style="background:#{{Typ/Color/Pflanze-dunkel}}"| {{#ic:Pflanze}} | ||
| style="background:#{{Typ/Color/Feuer-dunkel}}"| {{ic | | style="background:#{{Typ/Color/Feuer-dunkel}}"| {{#ic:Feuer}} | ||
| style="background:#{{Typ/Color/Wasser-dunkel}}"| {{ic | | style="background:#{{Typ/Color/Wasser-dunkel}}"| {{#ic:Wasser}} | ||
|- | |- | ||
! style="background:#{{Region/Color|Kanto}}" class="round-bottomleft" | <div class="blink">[[Entwicklung]]en</div> | ! style="background:#{{Region/Color|Kanto}}" class="round-bottomleft" | <div class="blink">[[Entwicklung]]en</div> | ||
| class="darkBg1" | <small>{{ | | class="darkBg1" | <small>{{#icon:Bisaknosp|name=link}} Lv. 16<br />{{#icon:Bisaflor|name=link}} Lv. 32</small> | ||
| class="darkBg1" | <small>{{ | | class="darkBg1" | <small>{{#icon:Glutexo|name=link}} Lv. 16<br />{{#icon:Glurak|name=link}} Lv. 36</small> | ||
| class="darkBg1 round-bottomright" | <small>{{ | | class="darkBg1 round-bottomright" | <small>{{#icon:Schillok|name=link}} Lv. 16<br />{{#icon:Turtok|name=link}} Lv. 36</small> | ||
|} | |} | ||
=== Pokémon Gelb === | === Pokémon Gelb === | ||
{| class="centered round c" cellspacing=3 style="border: 3px solid #{{Region/Color|Kanto}};" | {| class="centered round c" cellspacing=3 style="border: 3px solid #{{Region/Color|Kanto}};" | ||
|- | |- | ||
! style="background:#{{Region/Color|Kanto}}" colspan="2" class="round-top" | <div class="blink">[[Starter-Pokémon]]</div> | ! style="background:#{{Region/Color|Kanto}}" colspan="2" class="round-top" | <div class="blink">[[Starter-Pokémon]]</div> | ||
|- | |- | ||
! style="background:#{{Region/Color|Kanto}}"| Sprite | ! style="background:#{{Region/Color|Kanto}}"| Sprite | ||
! class="darkBg1" | {{Sprite|025|gelb}} | ! class="darkBg1" | {{Sprite|025|gelb}} | ||
|- | |- | ||
! style="background:#{{Region/Color|Kanto}}"| Name | ! style="background:#{{Region/Color|Kanto}}"| Name | ||
! class="darkBg1" | [[Pikachu]] | ! class="darkBg1" | [[Pikachu]] | ||
|- | |- | ||
! style="background:#{{Region/Color|Kanto}}" class="round-bottomleft"| <div class="blink">[[Typen|Typ]]</div> | ! style="background:#{{Region/Color|Kanto}}" class="round-bottomleft"| <div class="blink">[[Typen|Typ]]</div> | ||
! style="background:#{{Typ/Color/Elektro-dunkel}}" | ! style="background:#{{Typ/Color/Elektro-dunkel}}" class="round-bottomright" | {{#ic:Elektro}} | ||
|} | |} | ||
Die Ausnahme bildet [[Pokémon Gelb]] (die sogenannte ''Special Pikachu Edition''), dort bekommt man | Die Ausnahme bildet [[Pokémon Gelb]] (die sogenannte ''Special Pikachu Edition''), dort bekommt man | ||
| Zeile 78: | Zeile 78: | ||
=== Pokémon HeartGold/SoulSilver === | === Pokémon HeartGold/SoulSilver === | ||
Nach dem man in {{sk|HG|SS}} alle 16 Arenaleiter und [[Rot (Spielcharakter)|Rot]] auf dem Silberberg besiegt hat, kann man ebenfalls einen der Starter von Professor Eich erhalten. | Nach dem man in {{sk|HG|SS}} alle 16 Arenaleiter und [[Rot (Spielcharakter)|Rot]] auf dem [[Silberberg]] besiegt hat, kann man ebenfalls einen der Starter von Professor Eich erhalten. | ||
{| class="centered round c" cellspacing=3 style="border: 3px solid #{{Region/Color|Kanto}};" | {| class="centered round c" cellspacing=3 style="border: 3px solid #{{Region/Color|Kanto}};" | ||
|- | |- | ||
! style="background:#{{Region/Color|Kanto}}" colspan="4" class="round-top" | <div class="blink">[[Starter-Pokémon]]</div> | ! style="background:#{{Region/Color|Kanto}}" colspan="4" class="round-top" | <div class="blink">[[Starter-Pokémon]]</div> | ||
|- | |- | ||
! style="background:#{{Region/Color|Kanto}}"| Sprite | ! style="background:#{{Region/Color|Kanto}}"| Sprite | ||
! class="darkBg1" | {{Sprite|001|hgss}} | ! class="darkBg1" | {{Sprite|001|hgss}} | ||
! class="darkBg1" | {{Sprite|004|hgss}} | ! class="darkBg1" | {{Sprite|004|hgss}} | ||
! class="darkBg1" | {{Sprite|007|hgss}} | ! class="darkBg1" | {{Sprite|007|hgss}} | ||
|- | |- | ||
! style="background:#{{Region/Color|Kanto}}"| Name | ! style="background:#{{Region/Color|Kanto}}"| Name | ||
! class="darkBg1" | [[Bisasam]] | ! class="darkBg1" | [[Bisasam]] | ||
! class="darkBg1" | [[Glumanda]] | ! class="darkBg1" | [[Glumanda]] | ||
! class="darkBg1" | [[Schiggy]] | ! class="darkBg1" | [[Schiggy]] | ||
|- | |- | ||
! style="background:#{{Region/Color|Kanto}}"| <div class="blink">[[Typen|Typ]]</div> | ! style="background:#{{Region/Color|Kanto}}"| <div class="blink">[[Typen|Typ]]</div> | ||
| style="background:#{{Typ/Color/Pflanze-dunkel}}"| {{ic | | style="background:#{{Typ/Color/Pflanze-dunkel}}"| {{#ic:Pflanze}} | ||
| style="background:#{{Typ/Color/Feuer-dunkel}}"| {{ic | | style="background:#{{Typ/Color/Feuer-dunkel}}"| {{#ic:Feuer}} | ||
| style="background:#{{Typ/Color/Wasser-dunkel}}"| {{ic | | style="background:#{{Typ/Color/Wasser-dunkel}}"| {{#ic:Wasser}} | ||
|- | |- | ||
! style="background:#{{Region/Color|Kanto}}" class="round-bottomleft" | <div class="blink">[[Entwicklung]]en</div> | ! style="background:#{{Region/Color|Kanto}}" class="round-bottomleft" | <div class="blink">[[Entwicklung]]en</div> | ||
| class="darkBg1" | <small>{{ | | class="darkBg1" | <small>{{#icon:Bisaknosp|name=link}} Lv. 16<br />{{#icon:Bisaflor|name=link}} Lv. 32</small> | ||
| class="darkBg1" | <small>{{ | | class="darkBg1" | <small>{{#icon:Glutexo|name=link}} Lv. 16<br />{{#icon:Glurak|name=link}} Lv. 36</small> | ||
| class="darkBg1 round-bottomright" | <small>{{ | | class="darkBg1 round-bottomright" | <small>{{#icon:Schillok|name=link}} Lv. 16<br />{{#icon:Turtok|name=link}} Lv. 36</small> | ||
|} | |} | ||
| Zeile 120: | Zeile 120: | ||
== Realität == | == Realität == | ||
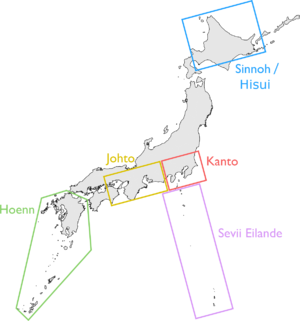
{{#tag:imagemap|Datei:Karte von Japan.png{{!}}thumb{{!}}300px{{!}}Kanto und naheliegende Regionen in der realen Welt. | |||
poly 724 76 1006 1 1061 208 779 283 [[Sinnoh]] | |||
poly 642 640 792 601 824 720 674 760 [[Kanto]] | |||
poly 412 702 639 642 670 761 443 821 [[Johto]] | |||
poly 164 788 265 757 349 795 365 997 113 1278 62 1229 [[Hoenn]] | |||
poly 646 771 797 731 931 1232 780 1272 [[Sevii Eilande]] | |||
desc none | desc none | ||
}} | |||
{{Hauptartikel|Regionen}} | {{Hauptartikel|Regionen}} | ||
Kanto ist, genau wie die anderen Regionen [[Johto]], [[Hoenn]], [[Sinnoh]], [[Einall]], [[Kalos]] und [[Alola]], auch in der realen Welt zu finden. Kanto basiert auf der {{wp||Kantō||icon}}-Region, welche die sieben Präfekturen um Japans Hauptstadt herum bildet. In den Spielen liegt [[Prismania City]] genau am selben Ort wie Tokio in der realen Welt, in den Spielen allerdings ist [[Saffronia City]] die Hauptstadt. | Kanto ist, genau wie die anderen Regionen [[Johto]], [[Hoenn]], [[Sinnoh]], [[Einall]], [[Kalos]] und [[Alola]], auch in der realen Welt zu finden. Kanto basiert auf der {{wp||Kantō||icon}}-Region, welche die sieben Präfekturen um Japans Hauptstadt herum bildet. In den Spielen liegt [[Prismania City]] genau am selben Ort wie Tokio in der realen Welt, in den Spielen allerdings ist [[Saffronia City]] die Hauptstadt. | ||
| Zeile 165: | Zeile 162: | ||
! style="background:#{{Typ/Color/Gestein-dunkel}}" | [[Marmoria City]] | ! style="background:#{{Typ/Color/Gestein-dunkel}}" | [[Marmoria City]] | ||
| im Osten: [[Route 3 (Kanto)|Route 3]]<br />im Süden: [[Route 2 (Kanto)|Route 2]] | | im Osten: [[Route 3 (Kanto)|Route 3]]<br />im Süden: [[Route 2 (Kanto)|Route 2]] | ||
| [[Pokémon-Arena von Marmoria City|Pokémon-Arena]]<br /> [[Marmoria City#Marmorias Museum der Wissenschaft|Museum der Wissenschaft]]<br /> | | [[Pokémon-Arena von Marmoria City|Pokémon-Arena]]<br /> [[Marmoria City#Marmorias Museum der Wissenschaft|Museum der Wissenschaft]]<br /> | ||
| {{tr|Overworldsprite|Rocko|S2W2}} [[Rocko]] | | {{tr|Overworldsprite|Rocko|S2W2}} [[Rocko]] | ||
| [[Datei:Felsorden.png|20px]] [[Felsorden]] | | [[Datei:Felsorden.png|20px]] [[Felsorden]] | ||
| Zeile 171: | Zeile 168: | ||
|- style="background:#{{Typ/Color/Wasser-hell}}" | |- style="background:#{{Typ/Color/Wasser-hell}}" | ||
| [[Datei:HGSS Azuria City.png|100px]] | | [[Datei:HGSS Azuria City.png|100px]] | ||
! style="background:#{{Typ/Color/Wasser-dunkel}}" | | ! style="background:#{{Typ/Color/Wasser-dunkel}}" | [[Azuria City]] | ||
| im Norden: [[Route 24 (Kanto)|Route 24]]<br/>im Osten: [[Route 9 (Kanto)|Route 9]]<br/>im Süden: [[Route 5 (Kanto)|Route 5]]<br />im Westen: [[Route 4 (Kanto)|Route 4]] | | im Norden: [[Route 24 (Kanto)|Route 24]]<br/>im Osten: [[Route 9 (Kanto)|Route 9]]<br/>im Süden: [[Route 5 (Kanto)|Route 5]]<br />im Westen: [[Route 4 (Kanto)|Route 4]] | ||
| [[Pokémon-Arena von Azuria City|Pokémon-Arena]]<br /> [[Azuria City#Radladen|Radladen]]<br /> [[Azuria-Höhle]] <br /> [[Azuria City#Beerenpudermann|Beerenpudermann]] | | [[Pokémon-Arena von Azuria City|Pokémon-Arena]]<br /> [[Azuria City#Radladen|Radladen]]<br /> [[Azuria-Höhle]] <br /> [[Azuria City#Beerenpudermann|Beerenpudermann]] | ||
| Zeile 249: | Zeile 246: | ||
| Höhle | | Höhle | ||
| [[Azuria City]] | | [[Azuria City]] | ||
| {{name | | {{#icon:Mewtu|name=link}} | ||
| {{sk|R|B|Ge|FR|BG|HG|SS}} | | {{sk|R|B|Ge|FR|BG|HG|SS}} | ||
|- style="background:#{{Route/Color/Höhle-hell}}" | |- style="background:#{{Route/Color/Höhle-hell}}" | ||
| Zeile 270: | Zeile 267: | ||
| Gebäude | | Gebäude | ||
| [[Route 10 (Kanto)|Route 10]] | | [[Route 10 (Kanto)|Route 10]] | ||
| {{name | | {{#icon:Zapdos|name=link}} <small>{{sk|R|B|Ge|FR|BG}}</small> | ||
| {{sk|R|B|Ge|G|Si|K|FR|BG|HG|SS}} | | {{sk|R|B|Ge|G|Si|K|FR|BG|HG|SS}} | ||
|- style="background:#{{Route/Color/Höhle-hell}}" | |- style="background:#{{Route/Color/Höhle-hell}}" | ||
| Zeile 326: | Zeile 323: | ||
| Höhle | | Höhle | ||
| [[Route 20 (Kanto)|Route 20]] | | [[Route 20 (Kanto)|Route 20]] | ||
| {{name | | {{#icon:Arktos|name=link}} <small>{{sk|R|B|Ge|FR|BG|HG|SS}}</small> | ||
| {{sk|R|B|Ge|FR|BG|HG|SS}} | | {{sk|R|B|Ge|FR|BG|HG|SS}} | ||
|- style="background:#{{Route/Color/Höhle-hell}}" | |- style="background:#{{Route/Color/Höhle-hell}}" | ||
| Zeile 333: | Zeile 330: | ||
| Höhle | | Höhle | ||
| [[Route 23 (Kanto)|Route 23]] <small>{{sk|R|B|Ge|G|Si|K|FR|BG}}</small><br /> [[Route 26 (Kanto)|Route 26]] <small>{{sk|G|Si|K|HG|SS}}</small><br /> [[Route 22 (Kanto)|Route 22]] <small>{{sk|G|Si|K|HG|SS}}</small><br /> [[Route 28 (Kanto)|Route 28]] <small>{{sk|G|Si|K|HG|SS}}</small><br /> [[Indigo Plateau]] <small>{{sk|HG|SS}}</small> | | [[Route 23 (Kanto)|Route 23]] <small>{{sk|R|B|Ge|G|Si|K|FR|BG}}</small><br /> [[Route 26 (Kanto)|Route 26]] <small>{{sk|G|Si|K|HG|SS}}</small><br /> [[Route 22 (Kanto)|Route 22]] <small>{{sk|G|Si|K|HG|SS}}</small><br /> [[Route 28 (Kanto)|Route 28]] <small>{{sk|G|Si|K|HG|SS}}</small><br /> [[Indigo Plateau]] <small>{{sk|HG|SS}}</small> | ||
| {{name | | {{#icon:Lavados|name=link}} <small>{{sk|R|B|Ge}}</small> | ||
| {{sk|R|B|Ge|G|Si|K|FR|BG|HG|SS}} | | {{sk|R|B|Ge|G|Si|K|FR|BG|HG|SS}} | ||
|- style="background:#{{Route/Color/Straße-hell}}" | |- style="background:#{{Route/Color/Straße-hell}}" | ||
| Zeile 350: | Zeile 347: | ||
| {{sk|G|Si|K|HG|SS}} | | {{sk|G|Si|K|HG|SS}} | ||
|- style="background:#{{Route/Color/Straße-hell}}" | |- style="background:#{{Route/Color/Straße-hell}}" | ||
| | | | ||
! style="background:#{{Route/Color/Straße-dunkel}}" | [[Tunnelpfad (Route 5–6)|Tunnelpfad]] {{tt|*|Route 5 bis 6}} | ! style="background:#{{Route/Color/Straße-dunkel}}" | [[Tunnelpfad (Route 5–6)|Tunnelpfad]] {{tt|*|Route 5 bis 6}} | ||
| Tunnelpfad | | Tunnelpfad | ||
| Zeile 357: | Zeile 354: | ||
| {{sk|R|B|Ge|G|Si|K|FR|BG|HG|SS}} | | {{sk|R|B|Ge|G|Si|K|FR|BG|HG|SS}} | ||
|- style="background:#{{Route/Color/Straße-hell}}" | |- style="background:#{{Route/Color/Straße-hell}}" | ||
| | | | ||
! style="background:#{{Route/Color/Straße-dunkel}}" | [[Tunnelpfad (Route 7–8)|Tunnelpfad]] {{tt|*|Route 7 bis 8}} | ! style="background:#{{Route/Color/Straße-dunkel}}" | [[Tunnelpfad (Route 7–8)|Tunnelpfad]] {{tt|*|Route 7 bis 8}} | ||
| Tunnelpfad | | Tunnelpfad | ||
| Zeile 375: | Zeile 372: | ||
Im Folgenden werden alle Routen Kantos aufgelistet: | Im Folgenden werden alle Routen Kantos aufgelistet: | ||
{| class=" | {| class="pwtable1" | ||
! bgcolor="{{Region/Color|Kanto}}" | Name | ! bgcolor="{{Region/Color|Kanto}}" | Name | ||
! bgcolor="{{Region/Color|Kanto}}" | Eingang | ! bgcolor="{{Region/Color|Kanto}}" | Eingang | ||
| Zeile 383: | Zeile 380: | ||
! bgcolor="{{Region/Color|Kanto}}" | Bemerkung | ! bgcolor="{{Region/Color|Kanto}}" | Bemerkung | ||
|- align="center" | |- align="center" | ||
| bgcolor="{{Route/Color/Land-hell}}" | [[Route 1 (Kanto)|Route 1]] | |||
| [[Alabastia]] | | [[Alabastia]] | ||
| [[Vertania City]] | | [[Vertania City]] | ||
| — | | — | ||
| {{sk|R|B|Ge|G|Si|K|FR|BG|HG|SS}} | | {{sk|R|B|Ge|G|Si|K|FR|BG|HG|SS}} | ||
| | | | ||
|- align="center" | |- align="center" | ||
| bgcolor="{{Route/Color/Land-hell}}" | [[Route 2 (Kanto)|Route 2]] | |||
| [[Vertania City]] | | [[Vertania City]] | ||
| [[Marmoria City]] | | [[Marmoria City]] | ||
| [[Vertania-Wald]] <small>{{sk|R|B|Ge|FR|BG|HG|SS}}</small><br /> [[Digdas Höhle]] | | [[Vertania-Wald]] <small>{{sk|R|B|Ge|FR|BG|HG|SS}}</small><br /> [[Digdas Höhle]] | ||
| {{sk|R|B|Ge|G|Si|K|FR|BG|HG|SS}} | | {{sk|R|B|Ge|G|Si|K|FR|BG|HG|SS}} | ||
| | | | ||
|- align="center" | |- align="center" | ||
| bgcolor="{{Route/Color/Land-hell}}" | [[Route 3 (Kanto)|Route 3]] | |||
| [[Marmoria City]] | | [[Marmoria City]] | ||
| [[Route 4 (Kanto)|Route 4]] <small>{{sk|R|B|Ge|FR|BG}}</small><br /> [[Mondberg]] <small>{{sk|G|Si|K|HG|SS}}</small> | | [[Route 4 (Kanto)|Route 4]] <small>{{sk|R|B|Ge|FR|BG}}</small><br /> [[Mondberg]] <small>{{sk|G|Si|K|HG|SS}}</small> | ||
| — | | — | ||
| {{sk|R|B|Ge|G|Si|K|FR|BG|HG|SS}} | | {{sk|R|B|Ge|G|Si|K|FR|BG|HG|SS}} | ||
| | | | ||
|- align="center" | |- align="center" | ||
| bgcolor="{{Route/Color/Land-hell}}" | [[Route 4 (Kanto)|Route 4]] | |||
| [[Route 3 (Kanto)|Route 3]] <small>{{sk|R|B|Ge|FR|BG}}</small><br /> [[Mondberg]] <small>{{sk|G|Si|K|HG|SS}}</small> | | [[Route 3 (Kanto)|Route 3]] <small>{{sk|R|B|Ge|FR|BG}}</small><br /> [[Mondberg]] <small>{{sk|G|Si|K|HG|SS}}</small> | ||
| [[Azuria City]] | | [[Azuria City]] | ||
| [[Mondberg]] <small>{{sk|R|B|Ge|FR|BG}}</small> | | [[Mondberg]] <small>{{sk|R|B|Ge|FR|BG}}</small> | ||
| {{sk|R|B|Ge|G|Si|K|FR|BG|HG|SS}} | | {{sk|R|B|Ge|G|Si|K|FR|BG|HG|SS}} | ||
| | | | ||
|- align="center" | |- align="center" | ||
| bgcolor="{{Route/Color/Land-hell}}" | [[Route 5 (Kanto)|Route 5]] | |||
| [[Azuria City]] | | [[Azuria City]] | ||
| [[Saffronia City]] | | [[Saffronia City]] | ||
| [[Pension]] <small>{{sk|R|B|Ge|FR|BG}}</small><br /> [[Tunnelpfad (Route 5–6)|Tunnelpfad]] | | [[Pension]] <small>{{sk|R|B|Ge|FR|BG}}</small><br /> [[Tunnelpfad (Route 5–6)|Tunnelpfad]] | ||
| {{sk|R|B|Ge|G|Si|K|FR|BG|HG|SS}} | | {{sk|R|B|Ge|G|Si|K|FR|BG|HG|SS}} | ||
| | | | ||
|- align="center" | |- align="center" | ||
| bgcolor="{{Route/Color/Land-hell}}" | [[Route 6 (Kanto)|Route 6]] | |||
| [[Saffronia City]] | | [[Saffronia City]] | ||
| [[Orania City]] | | [[Orania City]] | ||
| [[Tunnelpfad (Route 5–6)|Tunnelpfad]] | | [[Tunnelpfad (Route 5–6)|Tunnelpfad]] | ||
| {{sk|R|B|Ge|G|Si|K|FR|BG|HG|SS}} | | {{sk|R|B|Ge|G|Si|K|FR|BG|HG|SS}} | ||
| | | | ||
|- align="center" | |- align="center" | ||
| bgcolor="{{Route/Color/Land-hell}}" | [[Route 7 (Kanto)|Route 7]] | |||
| [[Saffronia City]] | | [[Saffronia City]] | ||
| [[Prismania City]] | | [[Prismania City]] | ||
| [[Tunnelpfad (Route 7–8)|Tunnelpfad]] | | [[Tunnelpfad (Route 7–8)|Tunnelpfad]] | ||
| {{sk|R|B|Ge|G|Si|K|FR|BG|HG|SS}} | | {{sk|R|B|Ge|G|Si|K|FR|BG|HG|SS}} | ||
| | | | ||
|- align="center" | |- align="center" | ||
| bgcolor="{{Route/Color/Land-hell}}" | [[Route 8 (Kanto)|Route 8]] | |||
| [[Saffronia City]] | | [[Saffronia City]] | ||
| [[Lavandia]] | | [[Lavandia]] | ||
| [[Tunnelpfad (Route 7–8)|Tunnelpfad]] | | [[Tunnelpfad (Route 7–8)|Tunnelpfad]] | ||
| {{sk|R|B|Ge|G|Si|K|FR|BG|HG|SS}} | | {{sk|R|B|Ge|G|Si|K|FR|BG|HG|SS}} | ||
| | | | ||
|- align="center" | |- align="center" | ||
| bgcolor="{{Route/Color/Land-hell}}" | [[Route 9 (Kanto)|Route 9]] | |||
| [[Azuria City]] | | [[Azuria City]] | ||
| [[Route 10 (Kanto)|Route 10]] | | [[Route 10 (Kanto)|Route 10]] | ||
| [[Felstunnel]] <small>{{sk|G|Si|K}}</small> | | [[Felstunnel]] <small>{{sk|G|Si|K}}</small> | ||
| {{sk|R|B|Ge|G|Si|K|FR|BG|HG|SS}} | | {{sk|R|B|Ge|G|Si|K|FR|BG|HG|SS}} | ||
| | | | ||
|- align="center" | |- align="center" | ||
| bgcolor="{{Route/Color/Land-hell}}" | [[Route 10 (Kanto)|Route 10]] | |||
| [[Route 9 (Kanto)|Route 9]] | | [[Route 9 (Kanto)|Route 9]] | ||
| [[Lavandia]] | | [[Lavandia]] | ||
| [[Felstunnel]] <small>{{sk|R|B|Ge|FR|BG|HG|SS}}</small><br /> [[Kraftwerk (Kanto)|Kraftwerk]] | | [[Felstunnel]] <small>{{sk|R|B|Ge|FR|BG|HG|SS}}</small><br /> [[Kraftwerk (Kanto)|Kraftwerk]] | ||
| {{sk|R|B|Ge|G|Si|K|FR|BG|HG|SS}} | | {{sk|R|B|Ge|G|Si|K|FR|BG|HG|SS}} | ||
| {{name | | {{#icon:Zapdos|name=link}} fangbar <small>{{sk|HG|SS}}</small> | ||
|- align="center" | |- align="center" | ||
| bgcolor="{{Route/Color/Land-hell}}" | [[Route 11 (Kanto)|Route 11]] | |||
| [[Orania City]] | | [[Orania City]] | ||
| [[Route 12 (Kanto)|Route 12]] | | [[Route 12 (Kanto)|Route 12]] | ||
| [[Digdas Höhle]] <small>{{sk|R|B|Ge|FR|BG|HG|SS}}</small> | | [[Digdas Höhle]] <small>{{sk|R|B|Ge|FR|BG|HG|SS}}</small> | ||
| {{sk|R|B|Ge|G|Si|K|FR|BG|HG|SS}} | | {{sk|R|B|Ge|G|Si|K|FR|BG|HG|SS}} | ||
| | | | ||
|- align="center" | |- align="center" | ||
| bgcolor="{{Route/Color/Wasser-hell}}" | [[Route 12 (Kanto)|Route 12]] | |||
| [[Lavandia]] | | [[Lavandia]] | ||
| [[Route 11 (Kanto)|Route 11]] <br /> [[Route 13 (Kanto)|Route 13]] | | [[Route 11 (Kanto)|Route 11]] <br /> [[Route 13 (Kanto)|Route 13]] | ||
| — | | — | ||
| {{sk|R|B|Ge|G|Si|K|FR|BG|HG|SS}} | | {{sk|R|B|Ge|G|Si|K|FR|BG|HG|SS}} | ||
| | | | ||
|- align="center" | |- align="center" | ||
| bgcolor="{{Route/Color/Land-hell}}" | [[Route 13 (Kanto)|Route 13]] | |||
| [[Route 12 (Kanto)|Route 12]] | | [[Route 12 (Kanto)|Route 12]] | ||
| [[Route 14 (Kanto)|Route 14]] | | [[Route 14 (Kanto)|Route 14]] | ||
| — | | — | ||
| {{sk|R|B|Ge|G|Si|K|FR|BG|HG|SS}} | | {{sk|R|B|Ge|G|Si|K|FR|BG|HG|SS}} | ||
| | | | ||
|- align="center" | |- align="center" | ||
| bgcolor="{{Route/Color/Land-hell}}" | [[Route 14 (Kanto)|Route 14]] | |||
| [[Route 13 (Kanto)|Route 13]] | | [[Route 13 (Kanto)|Route 13]] | ||
| [[Route 15 (Kanto)|Route 15]] | | [[Route 15 (Kanto)|Route 15]] | ||
| — | | — | ||
| {{sk|R|B|Ge|G|Si|K|FR|BG|HG|SS}} | | {{sk|R|B|Ge|G|Si|K|FR|BG|HG|SS}} | ||
| | | | ||
|- align="center" | |- align="center" | ||
| bgcolor="{{Route/Color/Land-hell}}" | [[Route 15 (Kanto)|Route 15]] | |||
| [[Fuchsania City]] | | [[Fuchsania City]] | ||
| [[Route 14 (Kanto)|Route 14]] | | [[Route 14 (Kanto)|Route 14]] | ||
| — | | — | ||
| {{sk|R|B|Ge|G|Si|K|FR|BG|HG|SS}} | | {{sk|R|B|Ge|G|Si|K|FR|BG|HG|SS}} | ||
| | | | ||
|- align="center" | |- align="center" | ||
| bgcolor="{{Route/Color/Land-hell}}" | [[Route 16 (Kanto)|Route 16]] | |||
| [[Prismania City]] | | [[Prismania City]] | ||
| [[Route 17 (Kanto)|Route 17]] | | [[Route 17 (Kanto)|Route 17]] | ||
| — | | — | ||
| {{sk|R|B|Ge|G|Si|K|FR|BG|HG|SS}} | | {{sk|R|B|Ge|G|Si|K|FR|BG|HG|SS}} | ||
| | | | ||
|- align="center" | |- align="center" | ||
| bgcolor="{{Route/Color/Wasser-hell}}" | [[Route 17 (Kanto)|Route 17]] | |||
| [[Route 16 (Kanto)|Route 16]] | | [[Route 16 (Kanto)|Route 16]] | ||
| [[Route 18 (Kanto)|Route 16]] | | [[Route 18 (Kanto)|Route 16]] | ||
| [[Radweg]] | | [[Radweg]] | ||
| {{sk|R|B|Ge|G|Si|K|FR|BG|HG|SS}} | | {{sk|R|B|Ge|G|Si|K|FR|BG|HG|SS}} | ||
| | | | ||
|- align="center" | |- align="center" | ||
| bgcolor="{{Route/Color/Land-hell}}" | [[Route 18 (Kanto)|Route 18]] | |||
| [[Fuchsania City]] | | [[Fuchsania City]] | ||
| [[Route 17 (Kanto)|Route 17]] | | [[Route 17 (Kanto)|Route 17]] | ||
| — | | — | ||
| {{sk|R|B|Ge|G|Si|K|FR|BG|HG|SS}} | | {{sk|R|B|Ge|G|Si|K|FR|BG|HG|SS}} | ||
| | | | ||
|- align="center" | |- align="center" | ||
| bgcolor="{{Route/Color/Wasser-hell}}" | [[Route 19 (Kanto)|Route 19]] | |||
| [[Fuchsania City]] | | [[Fuchsania City]] | ||
| [[Route 20 (Kanto)|Route 20]] | | [[Route 20 (Kanto)|Route 20]] | ||
| — | | — | ||
| {{sk|R|B|Ge|G|Si|K|FR|BG|HG|SS}} | | {{sk|R|B|Ge|G|Si|K|FR|BG|HG|SS}} | ||
| | | | ||
|- align="center" | |- align="center" | ||
| bgcolor="{{Route/Color/Wasser-hell}}" | [[Route 20 (Kanto)|Route 20]] | |||
| [[Zinnoberinsel]] | | [[Zinnoberinsel]] | ||
| [[Route 19 (Kanto)|Route 19]] | | [[Route 19 (Kanto)|Route 19]] | ||
| [[Seeschauminseln]] | | [[Seeschauminseln]] | ||
| {{sk|R|B|Ge|G|Si|K|FR|BG|HG|SS}} | | {{sk|R|B|Ge|G|Si|K|FR|BG|HG|SS}} | ||
| | | | ||
|- align="center" | |- align="center" | ||
| bgcolor="{{Route/Color/Wasser-hell}}" | [[Route 21 (Kanto)|Route 21]] | |||
| [[Alabastia]] | | [[Alabastia]] | ||
| [[Zinnoberinsel]] | | [[Zinnoberinsel]] | ||
| — | | — | ||
| {{sk|R|B|Ge|G|Si|K|FR|BG|HG|SS}} | | {{sk|R|B|Ge|G|Si|K|FR|BG|HG|SS}} | ||
| | | | ||
|- align="center" | |- align="center" | ||
| bgcolor="{{Route/Color/Land-hell}}" | [[Route 22 (Kanto)|Route 22]] | |||
| [[Vertania City]] | | [[Vertania City]] | ||
| [[Siegesstraße (Kanto)|Rezeption]] | | [[Siegesstraße (Kanto)|Rezeption]] | ||
| — | | — | ||
| {{sk|R|B|Ge|G|Si|K|FR|BG|HG|SS}} | | {{sk|R|B|Ge|G|Si|K|FR|BG|HG|SS}} | ||
| | | | ||
|- align="center" | |- align="center" | ||
| bgcolor="{{Route/Color/Land-hell}}" | [[Route 23 (Kanto)|Route 23]] | |||
| [[Siegesstraße (Kanto)|Rezeption]] <small>{{sk|R|B|Ge|FR|BG}}</small><br /> [[Siegesstraße (Kanto)|Siegesstraße]] | | [[Siegesstraße (Kanto)|Rezeption]] <small>{{sk|R|B|Ge|FR|BG}}</small><br /> [[Siegesstraße (Kanto)|Siegesstraße]] | ||
| [[Indigo Plateau]] | | [[Indigo Plateau]] | ||
| [[Siegesstraße (Kanto)|Siegesstraße]] <small>{{sk|R|B|Ge|FR|BG}}</small> | | [[Siegesstraße (Kanto)|Siegesstraße]] <small>{{sk|R|B|Ge|FR|BG}}</small> | ||
| {{sk|R|B|Ge|G|Si|K|FR|BG|HG|SS}} | | {{sk|R|B|Ge|G|Si|K|FR|BG|HG|SS}} | ||
| | | | ||
|- align="center" | |- align="center" | ||
| bgcolor="{{Route/Color/Wasser-hell}}" | [[Route 24 (Kanto)|Route 24]] | |||
| [[Azuria City]] | | [[Azuria City]] | ||
| [[Route 25 (Kanto)|Route 25]] | | [[Route 25 (Kanto)|Route 25]] | ||
| — | | — | ||
| {{sk|R|B|Ge|G|Si|K|FR|BG|HG|SS}} | | {{sk|R|B|Ge|G|Si|K|FR|BG|HG|SS}} | ||
| | | | ||
|- align="center" | |- align="center" | ||
| bgcolor="{{Route/Color/Land-hell}}" | [[Route 25 (Kanto)|Route 25]] | |||
| colspan="2"| [[Route 24 (Kanto)|Route 24]] | | colspan="2"| [[Route 24 (Kanto)|Route 24]] | ||
| [[Bills Küstenhaus]] | | [[Bills Küstenhaus]] | ||
| {{sk|R|B|Ge|G|Si|K|FR|BG|HG|SS}} | | {{sk|R|B|Ge|G|Si|K|FR|BG|HG|SS}} | ||
| | | | ||
|- align="center" | |- align="center" | ||
| bgcolor="{{Route/Color/Land-hell}}" | [[Route 26 (Kanto)|Route 26]] | |||
| [[Route 27 (Kanto)|Route 27]] | | [[Route 27 (Kanto)|Route 27]] | ||
| [[Siegesstraße (Kanto)|Rezeption]] | | [[Siegesstraße (Kanto)|Rezeption]] | ||
| [[Geschwister Wochentag|Haus der Geschwister Wochentag]] | | [[Geschwister Wochentag|Haus der Geschwister Wochentag]] | ||
| {{sk|G|Si|K|HG|SS}} | | {{sk|G|Si|K|HG|SS}} | ||
| | | | ||
|- align="center" | |- align="center" | ||
| bgcolor="{{Route/Color/Wasser-hell}}" | [[Route 27 (Kanto)|Route 27]] | |||
| [[Route 28 (Kanto)|Route 28]] | | [[Route 28 (Kanto)|Route 28]] | ||
| [[Neuborkia]] | | [[Neuborkia]] | ||
| [[Tohjo-Fälle]] | | [[Tohjo-Fälle]] | ||
| {{sk|G|Si|K|HG|SS}} | | {{sk|G|Si|K|HG|SS}} | ||
| | | | ||
|- align="center" | |- align="center" | ||
| bgcolor="{{Route/Color/Land-hell}}" | [[Route 28 (Kanto)|Route 28]] | |||
| [[Siegesstraße (Kanto)|Rezeption]] | | [[Siegesstraße (Kanto)|Rezeption]] | ||
| [[ | | [[Silberberg]] | ||
| — | | — | ||
| {{sk|G|Si|K|HG|SS}} | | {{sk|G|Si|K|HG|SS}} | ||
| | | | ||
|} | |} | ||
== Demografie == | == Demografie == | ||
{| class=" | {| class="pwtable1" | ||
|- style="text-align:center" | |- style="text-align:center" | ||
! bgcolor="{{Region/Color|Kanto}}" rowspan="2" | Stadt | ! bgcolor="{{Region/Color|Kanto}}" rowspan="2" | Stadt | ||
| Zeile 590: | Zeile 587: | ||
! bgcolor="{{Region/Color|Kanto}}" | {{sk|HG|SS}} | ! bgcolor="{{Region/Color|Kanto}}" | {{sk|HG|SS}} | ||
|- | |- | ||
| [[Alabastia]] | |||
| colspan="4" style="text-align:center" | 8 | | colspan="4" style="text-align:center" | 8 | ||
|- | |- | ||
| [[Vertania City]] | |||
| style="text-align:center" | 28 | | style="text-align:center" | 28 | ||
| style="text-align:center" | 25 | | style="text-align:center" | 25 | ||
| Zeile 599: | Zeile 596: | ||
| style="text-align:center" | 33 | | style="text-align:center" | 33 | ||
|- | |- | ||
| [[Marmoria City]] | |||
| style="text-align:center" | 28 | | style="text-align:center" | 28 | ||
| style="text-align:center" | 18 | | style="text-align:center" | 18 | ||
| Zeile 605: | Zeile 602: | ||
| style="text-align:center" | 29 | | style="text-align:center" | 29 | ||
|- | |- | ||
| [[Azuria City]] | |||
| style="text-align:center" | 27 | | style="text-align:center" | 27 | ||
| style="text-align:center" | 24 | | style="text-align:center" | 24 | ||
| colspan="2" style="text-align:center" | 32 | | colspan="2" style="text-align:center" | 32 | ||
|- | |- | ||
| [[Orania City]] | |||
| style="text-align:center" | 25 | | style="text-align:center" | 25 | ||
| style="text-align:center" | 26 | | style="text-align:center" | 26 | ||
| Zeile 616: | Zeile 613: | ||
| style="text-align:center" | 29 | | style="text-align:center" | 29 | ||
|- | |- | ||
| [[Lavandia]] | |||
| style="text-align:center" | 36 | | style="text-align:center" | 36 | ||
| style="text-align:center" | 27 | | style="text-align:center" | 27 | ||
| Zeile 622: | Zeile 619: | ||
| style="text-align:center" | 31 | | style="text-align:center" | 31 | ||
|- | |- | ||
| [[Prismania City]] | |||
| style="text-align:center" | 81 | | style="text-align:center" | 81 | ||
| style="text-align:center" | 63 | | style="text-align:center" | 63 | ||
| Zeile 628: | Zeile 625: | ||
| style="text-align:center" | 67 | | style="text-align:center" | 67 | ||
|- | |- | ||
| [[Fuchsania City]] | |||
| style="text-align:center" | 29 | | style="text-align:center" | 29 | ||
| style="text-align:center" | 22 | | style="text-align:center" | 22 | ||
| Zeile 634: | Zeile 631: | ||
| style="text-align:center" | 36 | | style="text-align:center" | 36 | ||
|- | |- | ||
| [[Saffronia City]] | |||
| style="text-align:center" | 50 | | style="text-align:center" | 50 | ||
| style="text-align:center" | 35 | | style="text-align:center" | 35 | ||
| Zeile 640: | Zeile 637: | ||
| style="text-align:center" | 43 | | style="text-align:center" | 43 | ||
|- | |- | ||
| [[Zinnoberinsel]] | |||
| style="text-align:center" | 33 | | style="text-align:center" | 33 | ||
| style="text-align:center" | 6 | | style="text-align:center" | 6 | ||
| Zeile 646: | Zeile 643: | ||
| style="text-align:center" | 10 | | style="text-align:center" | 10 | ||
|- | |- | ||
| [[Indigo Plateau]] | |||
| style="text-align:center" | 10 | | style="text-align:center" | 10 | ||
| style="text-align:center" | 9 | | style="text-align:center" | 9 | ||
| Zeile 652: | Zeile 649: | ||
| style="text-align:center" | 15 | | style="text-align:center" | 15 | ||
|- | |- | ||
| '''Stadtbevölkerung<br />Gesamt''' | |||
| style="text-align:center" | 355 | | style="text-align:center" | 355 | ||
| style="text-align:center" | 263 | | style="text-align:center" | 263 | ||
| Zeile 665: | Zeile 662: | ||
== Liste der Arenaleiter == | == Liste der Arenaleiter == | ||
[[Datei:LigaSymbolKanto.png|Aus-<br/>zeichnung in {{sk|HG|SS}}|right|framed]] | [[Datei:LigaSymbolKanto.png|Aus-<br/>zeichnung in {{sk|HG|SS}}|right|framed]] | ||
=== 1. und 3. Generation === | === 1. und 3. Generation === | ||
{| class=" | {| class="pwtable1 c" | ||
|- class="darkBg2" | |- class="darkBg2" | ||
! [[Typen|Typ]] | ! [[Typen|Typ]] | ||
! [[Arenaleiter]] | ! [[Arenaleiter]] | ||
! Stadt | ! Stadt | ||
|- | |- | ||
| {{ic | | {{#ic:Gestein}} | ||
| {{tr|Overworldsprite|Rocko|S2W2}} [[Rocko]] | | {{tr|Overworldsprite|Rocko|S2W2}} [[Rocko]] | ||
| [[Marmoria City]] | | [[Marmoria City]] | ||
|- | |- | ||
| {{ic | | {{#ic:Wasser}} | ||
| {{tr|Overworldsprite|Misty|S2W2}} [[Misty]] | | {{tr|Overworldsprite|Misty|S2W2}} [[Misty]] | ||
| [[Azuria City]] | | [[Azuria City]] | ||
|- | |- | ||
| {{ic | | {{#ic:Elektro}} | ||
| {{tr|Overworldsprite|Major Bob|S2W2}} [[Major Bob]] | | {{tr|Overworldsprite|Major Bob|S2W2}} [[Major Bob]] | ||
| [[Orania City]] | | [[Orania City]] | ||
|- | |- | ||
| {{ic | | {{#ic:Pflanze}} | ||
| {{tr|Overworldsprite|Erika|S2W2}} [[Erika]] | | {{tr|Overworldsprite|Erika|S2W2}} [[Erika]] | ||
| [[Prismania City]] | | [[Prismania City]] | ||
|- | |- | ||
| {{ic | | {{#ic:Gift}} | ||
| {{tr|Overworldsprite|Koga|HGSS}} [[Koga]] | | {{tr|Overworldsprite|Koga|HGSS}} [[Koga]] | ||
| [[Fuchsania City]] | | [[Fuchsania City]] | ||
|- | |- | ||
| {{ic | | {{#ic:Psycho}} | ||
| {{tr|Overworldsprite|Sabrina|S2W2}} [[Sabrina]] | | {{tr|Overworldsprite|Sabrina|S2W2}} [[Sabrina]] | ||
| [[Saffronia City]] | | [[Saffronia City]] | ||
|- | |- | ||
| {{ic | | {{#ic:Feuer}} | ||
| {{tr|Overworldsprite|Pyro|S2W2}} [[Pyro]] | | {{tr|Overworldsprite|Pyro|S2W2}} [[Pyro]] | ||
| [[Zinnoberinsel]] | | [[Zinnoberinsel]] | ||
|- | |- | ||
| {{ic | | {{#ic:Boden}} | ||
| {{tr|Overworldsprite|Giovanni|S2W2}} [[Giovanni]] | | {{tr|Overworldsprite|Giovanni|S2W2}} [[Giovanni]] | ||
| [[Vertania City]] | | [[Vertania City]] | ||
|} | |} | ||
=== 2. und 4. Generation === | === 2. und 4. Generation === | ||
{| class=" | {| class="pwtable1 c" | ||
|- | |- class="darkBg2" | ||
! [[Typen|Typ]] | ! [[Typen|Typ]] | ||
! [[Arenaleiter]] | ! [[Arenaleiter]] | ||
! Stadt | ! Stadt | ||
|- | |- | ||
| {{ic | | {{#ic:Elektro}} | ||
| {{tr|Overworldsprite|Major Bob|S2W2}} [[Major Bob]] | | {{tr|Overworldsprite|Major Bob|S2W2}} [[Major Bob]] | ||
| [[Orania City]] | | [[Orania City]] | ||
|- | |- | ||
| {{ic | | {{#ic:Psycho}} | ||
| {{tr|Overworldsprite|Sabrina|S2W2}} [[Sabrina]] | | {{tr|Overworldsprite|Sabrina|S2W2}} [[Sabrina]] | ||
| [[Saffronia City]] | | [[Saffronia City]] | ||
|- | |- | ||
| {{ic | | {{#ic:Pflanze}} | ||
| {{tr|Overworldsprite|Erika|S2W2}} [[Erika]] | | {{tr|Overworldsprite|Erika|S2W2}} [[Erika]] | ||
| [[Prismania City]] | | [[Prismania City]] | ||
|- | |- | ||
| {{ic | | {{#ic:Wasser}} | ||
| {{tr|Overworldsprite|Misty|S2W2}} [[Misty]] | | {{tr|Overworldsprite|Misty|S2W2}} [[Misty]] | ||
| [[Azuria City]] | | [[Azuria City]] | ||
|- | |- | ||
| {{ic | | {{#ic:Gift}} | ||
| {{tr|Overworldsprite|Janina|S2W2}} [[Janina]] | | {{tr|Overworldsprite|Janina|S2W2}} [[Janina]] | ||
| [[Fuchsania City]] | | [[Fuchsania City]] | ||
|- | |- | ||
| {{ic | | {{#ic:Gestein}} | ||
| {{tr|Overworldsprite|Rocko|S2W2}} [[Rocko]] | | {{tr|Overworldsprite|Rocko|S2W2}} [[Rocko]] | ||
| [[Marmoria City]] | | [[Marmoria City]] | ||
|- | |- | ||
| {{ic | | {{#ic:Feuer}} | ||
| {{tr|Overworldsprite|Pyro|S2W2}} [[Pyro]] | | {{tr|Overworldsprite|Pyro|S2W2}} [[Pyro]] | ||
| [[Seeschauminseln]] | | [[Seeschauminseln]] | ||
| Zeile 745: | Zeile 740: | ||
| {{tr|Overworldsprite|Blau|S2W2}} [[Blau Eich|Blau]] | | {{tr|Overworldsprite|Blau|S2W2}} [[Blau Eich|Blau]] | ||
| [[Vertania City]] | | [[Vertania City]] | ||
|} | |}{{clear}} | ||
== Trivia == | == Trivia == | ||
* Die meisten Städtenamen in Kanto sind von Farben abgeleitet und enden auf „-ia“. | * Die meisten Städtenamen in Kanto sind von Farben abgeleitet und enden auf „-ia“. | ||
* Kanto ist die einzige Region, in welcher es [[Arenaleiter]] aller drei ([[Feuer]], [[Pflanze]] und [[Wasser]]), bzw. vier (mit [[Elektro]]), Starter-Typen gibt. In [[ | * Kanto ist die einzige Region, in welcher es [[Arenaleiter]] aller drei ([[Feuer]], [[Pflanze]] und [[Wasser]]), bzw. vier (mit [[Elektro]]), Starter-Typen gibt. In [[Einall]] gibt es auch alle vorher genannten vier [[Typen]], jedoch kämpft man dort nur gegen zwei dieser Typen (siehe [[Pokémon-Arena von Orion City|hier]]). | ||
* In [[Pokémon GO]] existiert eine gleichnamige [[Medaillen (Pokémon GO)|Medaille]], die durch das Fangen einer bestimmten Anzahl [[Pokémon (Spezies)|Pokémon]] erlangt werden kann. | * In [[Pokémon GO]] existiert eine gleichnamige [[Medaillen (Pokémon GO)|Medaille]], die durch das Fangen einer bestimmten Anzahl [[Pokémon (Spezies)|Pokémon]] erlangt werden kann. | ||
Version vom 4. Februar 2018, 03:34 Uhr
Vorlage:Region Infobox Kanto ist die Region der 1. Generation, in der das Geschehen von Pokémon Rot & Blau, Pokémon Gelb, Pokémon Feuerrot und Pokémon Blattgrün hauptsächlich spielt. In Pokémon Gold, Silber und Pokémon Kristall sowie HeartGold und SoulSilver kann man im späteren Spielverlauf Kanto besuchen, wobei es dort aber eher ein „Zukunfts-Kanto“ ist, da seit der 1. Generation einiges an Zeit vergangen ist.

Starter
Pokémon Rot/Grün/Blau/Feuerrot/Blattgrün
| Sprite | |||
|---|---|---|---|
| Name | Bisasam | Glumanda | Schiggy |
Pokémon Gelb
| Sprite | |
|---|---|
| Name | Pikachu |
Die Ausnahme bildet Pokémon Gelb (die sogenannte Special Pikachu Edition), dort bekommt man Pikachu als Starter-Pokémon. Wenn man es allerdings entwickeln will, muss man es auf eine andere Edition tauschen und ihm dort einen Donnerstein geben. Ist Pikachu jedoch entwickelt, wird es dem Spieler nicht mehr folgen.
Pokémon HeartGold/SoulSilver
Nach dem man in HGSS alle 16 Arenaleiter und Rot auf dem Silberberg besiegt hat, kann man ebenfalls einen der Starter von Professor Eich erhalten.
| Sprite | |||
|---|---|---|---|
| Name | Bisasam | Glumanda | Schiggy |
Karten von Kanto


Realität
- → Hauptartikel: Regionen
Kanto ist, genau wie die anderen Regionen Johto, Hoenn, Sinnoh, Einall, Kalos und Alola, auch in der realen Welt zu finden. Kanto basiert auf der Kantō![]() -Region, welche die sieben Präfekturen um Japans Hauptstadt herum bildet. In den Spielen liegt Prismania City genau am selben Ort wie Tokio in der realen Welt, in den Spielen allerdings ist Saffronia City die Hauptstadt.
-Region, welche die sieben Präfekturen um Japans Hauptstadt herum bildet. In den Spielen liegt Prismania City genau am selben Ort wie Tokio in der realen Welt, in den Spielen allerdings ist Saffronia City die Hauptstadt.
Liste der Städte in der Kanto-Region


Liste der Sehenswürdigkeiten in Kanto
Im Folgenden werden alle Sehenswürdigkeiten Kantos alphabetisch aufgelistet:


Liste der Routen in Kanto
Im Folgenden werden alle Routen Kantos aufgelistet:
Demografie
| Stadt | Demografie | |||
|---|---|---|---|---|
| RBG | GSK | FRBG | HGSS | |
| Alabastia | 8 | |||
| Vertania City | 28 | 25 | 30 | 33 |
| Marmoria City | 28 | 18 | 33 | 29 |
| Azuria City | 27 | 24 | 32 | |
| Orania City | 25 | 26 | 30 | 29 |
| Lavandia | 36 | 27 | 41 | 31 |
| Prismania City | 81 | 63 | 82 | 67 |
| Fuchsania City | 29 | 22 | 35 | 36 |
| Saffronia City | 50 | 35 | 63 | 43 |
| Zinnoberinsel | 33 | 6 | 36 | 10 |
| Indigo Plateau | 10 | 9 | 14 | 15 |
| Stadtbevölkerung Gesamt |
355 | 263 | 404 | 333 |
Die Sevii-Inseln
- → Hauptartikel: Sevii Eilande
Südlich von Kanto liegen die Sevii Eiland-Inseln aus Feuerrot und Blattgrün, die ebenfalls noch zu dieser Region dazuzählen.
Liste der Arenaleiter

zeichnung in HGSS
1. und 3. Generation
| Typ | Arenaleiter | Stadt |
|---|---|---|
| Marmoria City | ||
| Azuria City | ||
| Orania City | ||
| Prismania City | ||
| Fuchsania City | ||
| Saffronia City | ||
| Zinnoberinsel | ||
| Vertania City |
2. und 4. Generation
| Typ | Arenaleiter | Stadt |
|---|---|---|
| Orania City | ||
| Saffronia City | ||
| Prismania City | ||
| Azuria City | ||
| Fuchsania City | ||
| Marmoria City | ||
| Seeschauminseln | ||
| kein best. | Vertania City |
Trivia
- Die meisten Städtenamen in Kanto sind von Farben abgeleitet und enden auf „-ia“.
- Kanto ist die einzige Region, in welcher es Arenaleiter aller drei (Feuer, Pflanze und Wasser), bzw. vier (mit Elektro), Starter-Typen gibt. In Einall gibt es auch alle vorher genannten vier Typen, jedoch kämpft man dort nur gegen zwei dieser Typen (siehe hier).
- In Pokémon GO existiert eine gleichnamige Medaille, die durch das Fangen einer bestimmten Anzahl Pokémon erlangt werden kann.